Building Secure CI/CD Pipelines: DevSecOps in Action
DevOps
– 10 Min Read
Modern software development is moving fast. Teams push code multiple times daily, and security often becomes an afterthought. This creates a problem: vulnerabilities slip through and fixing them later costs more time and money. DevSecOps in CI/CD solves this by making security part of every step in your development process.
This guide shows you how to build a secure CI/CD pipeline that automatically checks your code for security issues before it reaches production. With security scanning built into the workflow, we’ll deploy a web application to AWS EKS (Elastic Kubernetes Service) using GitHub Actions.
Think of this CI/ CD pipeline as an assembly line for your code. Raw code goes in one end, and a secure, deployed application comes out the other. Along the way, automated security checks catch problems early, when they’re easier to fix.
Our pipeline includes several key components. GitHub stores our source code and runs our automation. Snyk performs security scans to find vulnerabilities. Azure Container Registry holds our Docker images. AWS EKS runs our application in production. Terraform manages all our cloud infrastructure as code.
The pipeline follows a straightforward flow. Developers push code to GitHub. This triggers automated builds and security scans. If the code passes all checks, it gets packaged in a container. The container passes it through one more security scan, then deploys to our Kubernetes cluster.
Here’s what happens at each stage:
Before we deploy anything, we need infrastructure. Terraform lets us define our AWS resources in code files. This approach has several benefits. You can version control your infrastructure. You can review changes before applying them. You can spin up identical environments for testing.
Our Terraform configuration creates several AWS resources. The EKS cluster provides the Kubernetes control plane. Worker nodes run our application containers. Security groups control network access. IAM roles manage permissions. An S3 bucket stores Terraform’s state file.
Organizing Terraform files properly makes maintenance easier. Each file has a specific purpose:
terraform/
├── backend.tf # S3 backend configuration
├── eks.tf # EKS cluster definition
├── iam.tf # IAM roles and policies
├── kubeconfig.sh # Helper script for kubectl
├── outputs.tf # Values to display after creation
├── providers.tf # AWS provider configuration
├── variables.tf # Input variables
The backend.tf file tells Terraform where to store its state. State tracks what resources exist and their current configuration. Storing state in S3 allows team members to collaborate without conflicts.
The eks.tf file defines our Kubernetes cluster. It specifies the cluster version, networking configuration, and node group settings. The node group determines how many worker instances run and what type they are.
IAM configuration in iam.tf sets up the permissions our cluster needs. EKS requires specific roles for the control plane and worker nodes. These roles allow Kubernetes to manage AWS resources on our behalf.
The outputs.tf file displays important information after Terraform runs. This includes the cluster endpoint, certificate data, and security group IDs. You’ll need these values to connect to your cluster.
After Terraform creates the cluster, the kubeconfig.sh script helps configure kubectl:
aws eks –region us-east-2 update-kubeconfig –name devops-playground-cluster
kubectl get nodes
This script updates your local Kubernetes configuration to connect to the new cluster. Running kubectl get nodes verifies the connection works.
Our sample application demonstrates DevSecOps implementation without unnecessary complexity. It’s a Python Flask service that displays a welcome message. While simple, it includes all the components in a production application.
The application consists of three main files. app.py which contains the Flask application code. Dockerfile defines how to package the app into a container. requirements.txt lists Python dependencies.
The Flask application serves a simple HTML page. It includes proper HTML escaping to prevent XSS attacks. The /update endpoint shows how to handle API requests safely:
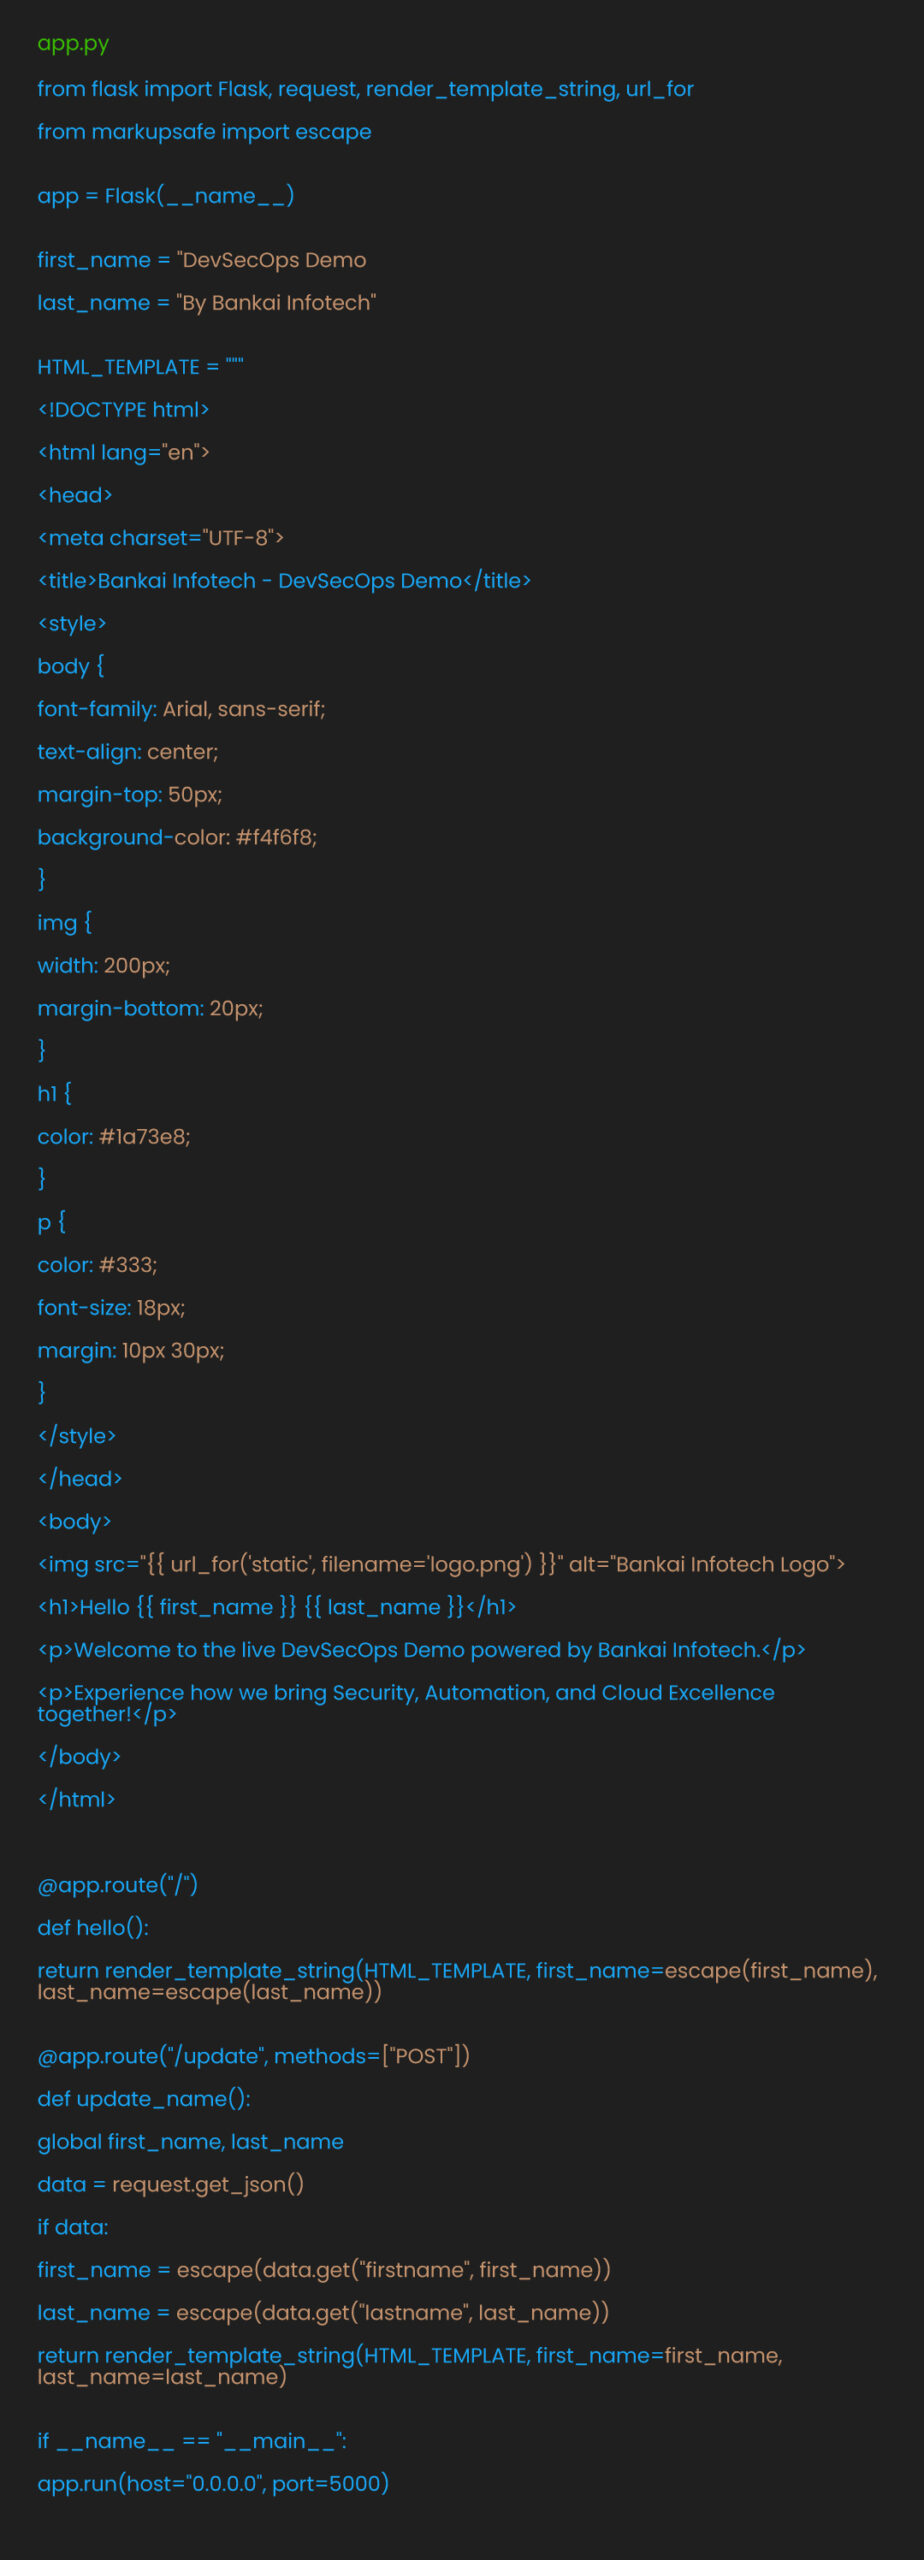
Notice how the code uses escape() on user input. This prevents malicious scripts from running if someone tries to inject them on HTML or JavaScript.
The Dockerfile defines our container image. It starts with a minimal Python base image to reduce the attack surface. Each instruction adds a layer to the image:
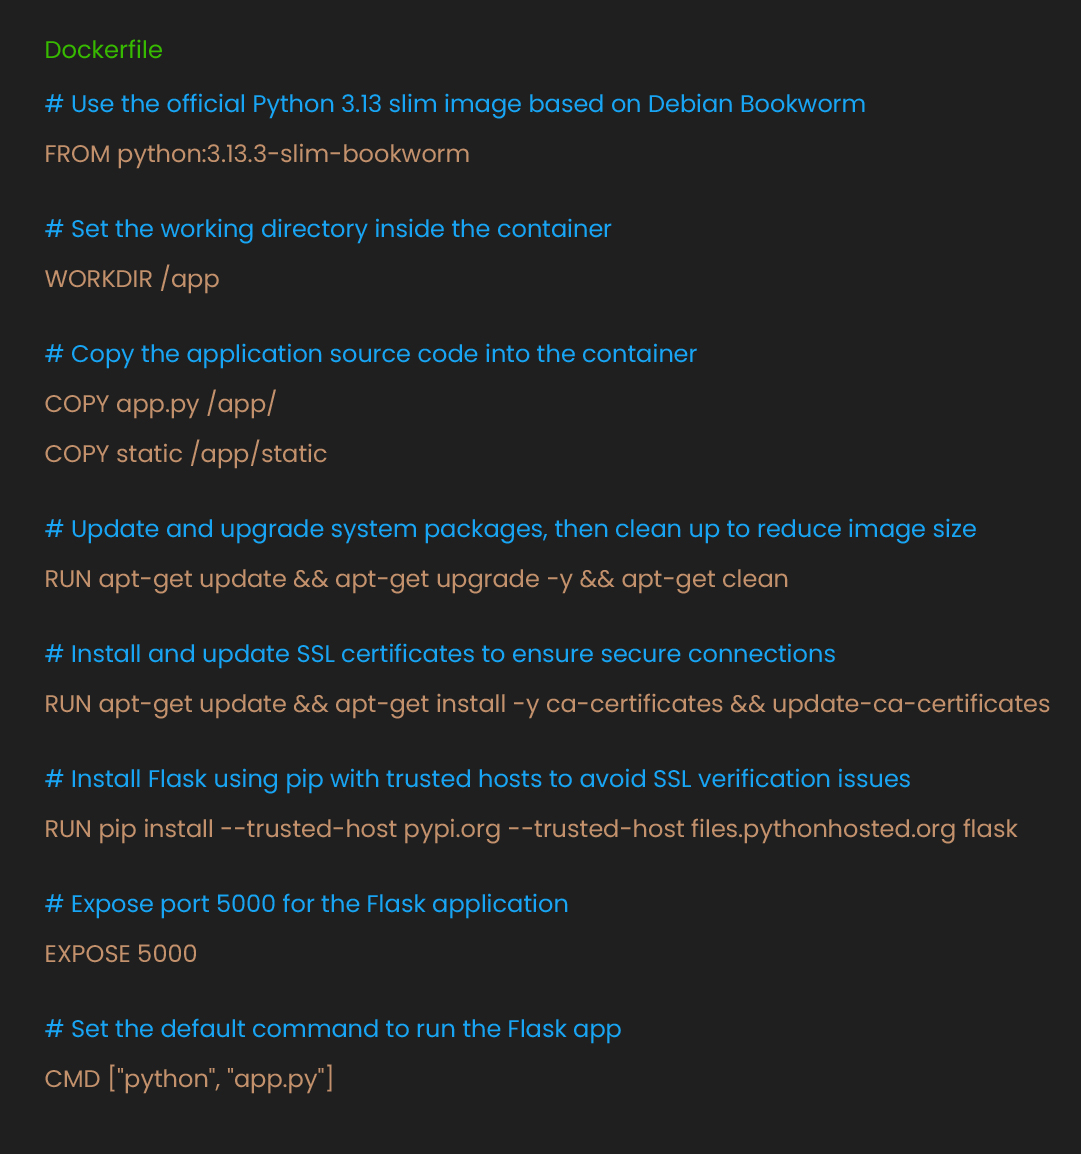
The Dockerfile uses a slim base image to minimize vulnerabilities. System packages get updated to patch known issues. SSL certificates ensure secure connections to package repositories.
Dependencies need careful management to avoid vulnerabilities. Our requirements file pins specific versions:
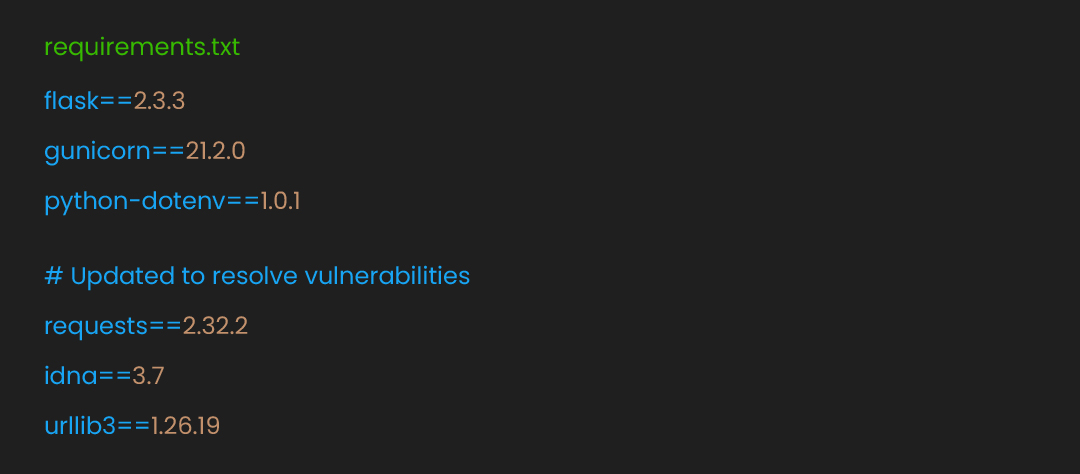
Pinning versions prevent unexpected updates that might introduce bugs or vulnerabilities. The comments note when versions were updated for security reasons.
Kubernetes uses YAML files to define how applications run. These manifests describe the desired state of our application. Kubernetes continuously works to maintain this state. To know how Kubernetes implementation can help you deliver, read our blog on 4 Key Benefits of Implementing Kubernetes.
Our Kubernetes configuration includes several files:
kubernetes/
├── deployment.yaml # Application deployment
├── hpa.yaml # Horizontal Pod Autoscaler
├── ingressrule.yml # Public access configuration
├── metrics-server.yaml # Metrics for autoscaling
├── namespace.yaml # Isolated environment
Each file serves a specific purpose in our deployment:
The real power of DevSecOps comes from automation. Our GitHub Actions workflows run security checks automatically, catching issues before they reach production. We use two complementary workflows for different stages of development.
The first workflow, security-scan.yml, runs whenever someone creates a pull request. This catches security issues before code merges into the main branch. Early detection means developers can fix problems while the code is still fresh in their minds.
This workflow performs three types of security scans:
SAST (Static Application Security Testing) examines source code for security flaws. It looks for common vulnerabilities like SQL injection, XSS, and insecure cryptography.
SCA (Software Composition Analysis) checks third-party dependencies for known vulnerabilities. Open-source libraries often contain security issues that attackers can exploit.
Report Generation creates HTML reports for human review. Visual reports make it easier to understand and prioritize security findings.
Here’s the complete workflow:
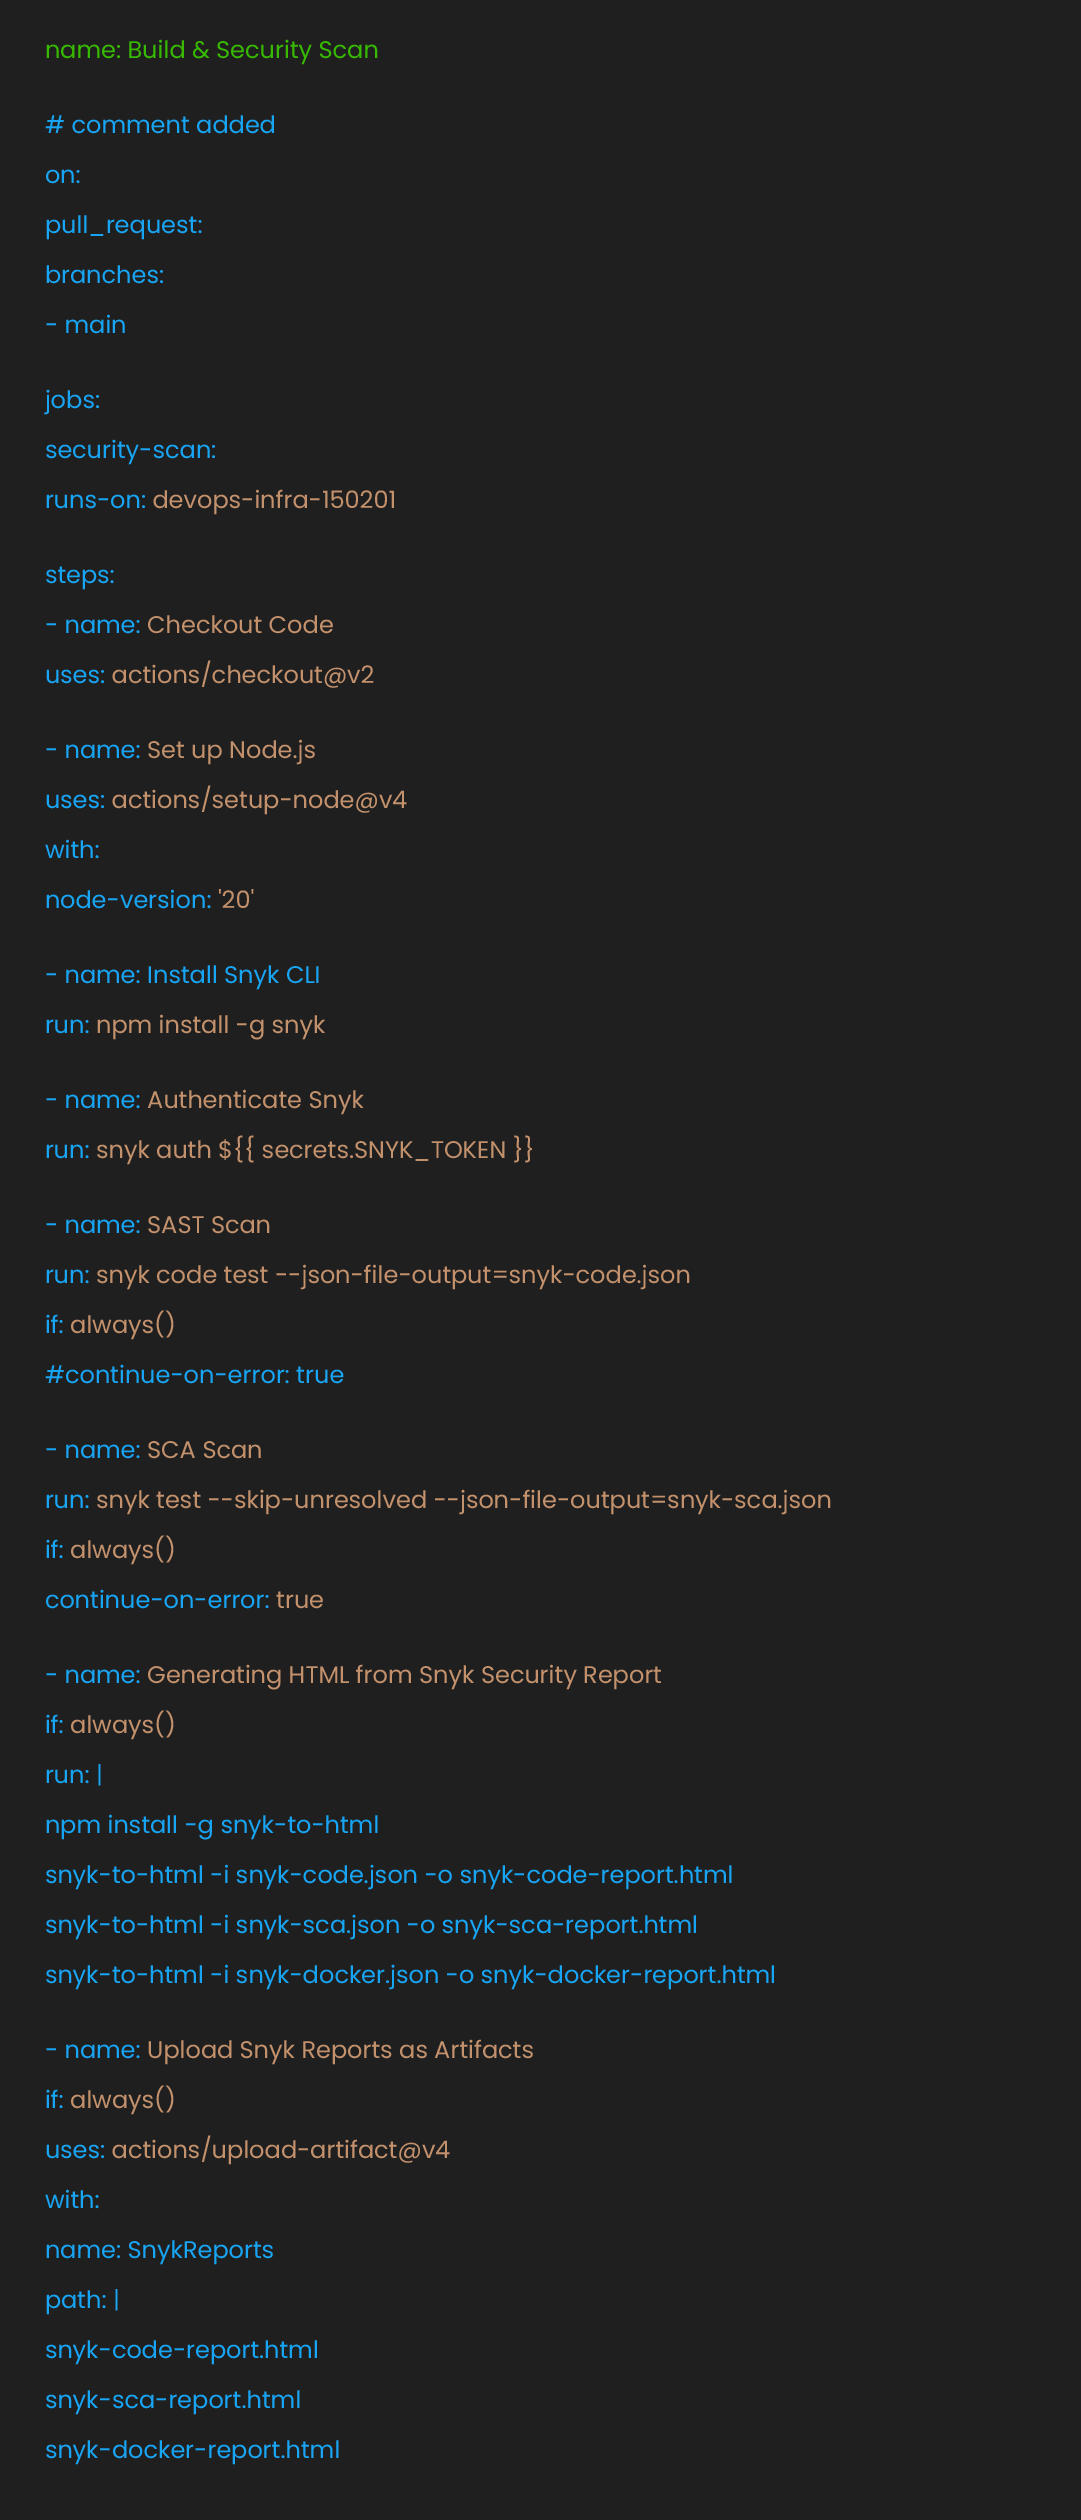
The workflow uses if: always() to ensure reports are generated even if scans find issues. This helps developers understand what needs fixing. The continue-on-error: true on SCA scanning prevents the workflow from blocking dependency issues that might take time to resolve.
Once the code passes review and merges, the deploy.yml workflow takes over. This comprehensive pipeline handles everything from building containers to deploying to production. it includes additional security checks and compliance validation.
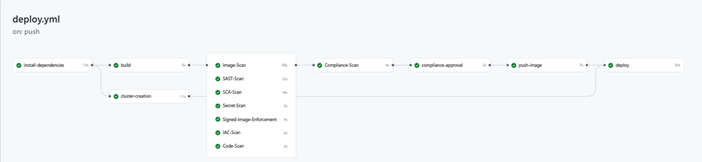
The deployment pipeline follows these stages:
Each stage builds on the previous one. If any security scan fails, the pipeline stops. This prevents vulnerable code from reaching production.
The manual approval step adds human judgment to the process. While automation catches known issues, experienced engineers can spot architectural problems or business logic flaws that tools might miss.
Our pipeline implements defense in depth. Multiple security checks at different stages catch different types of vulnerabilities.
Code-level security starts with SAST scanning. This analyzes source code patterns to find potential vulnerabilities. It catches issues like hardcoded passwords, SQL injection risks, and insecure random number generation.
Dependency security comes from SCA scanning. Most applications rely heavily on third-party libraries. SCA checks these dependencies against vulnerability databases. When security researchers discover new vulnerabilities, SCA alerts you to update affected libraries.
Container security involves scanning Docker images. Containers include an operating system layer with its packages. Image scanning checks both the OS packages and application dependencies. It also validates the Dockerfile for security best practices.
Infrastructure security uses IaC scanning on Terraform files. This catches misconfigurations like overly permissive security groups or unencrypted storage. Finding these issues before deployment prevents cloud security breaches.
Runtime security in Kubernetes includes network policies, pod security standards, and RBAC (Role-Based Access Control). While not covered in detail here, these controls limit what compromised containers can do.
Implementing DevSecOps brings several advantages to your development process.
Early detection reduces costs. Finding vulnerabilities during development costs far less than fixing them in production. Developers can address issues while the code context is fresh.
Automation ensures consistency. Manual security reviews often miss issues or apply standards inconsistently. Automated scanning checks every commit the same way.
Continuous improvement becomes natural. As new vulnerability patterns emerge, you can add checks to catch them. The pipeline evolves with the threat landscape.
Compliance becomes easier. Many regulations require security scanning and approval processes. This pipeline provides audit trails and reports for compliance teams.
Developer education happens organically. When security scanning flags issues, developers learn about security vulnerabilities. Over time, they write more secure code from the beginning.
Building a DevSecOps pipeline isn’t without challenges. Here are common issues teams face and how to address them.
False positives frustrate developers. Security tools often flag safe code. Configure your scanners to suppress known false positives. Document why specific findings are acceptable in your context.
Build times increase with scanning. Security scans add time to your pipeline. Run quick scans on every commit and comprehensive scans before deployment. Use caching to avoid rescanning unchanged dependencies.
Tool integration requires effort. Each security tool has its format and API. Use workflow orchestration tools like GitHub Actions to standardize integration. Create reusable workflow templates for common patterns.
Fixing vulnerabilities takes time. Sometimes you can’t immediately update a vulnerable dependency. Use virtual patching or compensating controls while you work on proper fixes. Document temporary exceptions with expiration dates.
This pipeline provides a solid foundation for DevSecOps in CI/CD. Consider these enhancements as your security program matures:
Add runtime security monitoring to detect attacks in production. Implement security testing in development environments before code reaches the pipeline. Create security champions for each development team. Build dashboards to track security metrics over time. Automate compliance reporting for auditors.
Remember that DevSecOps implementation is a journey, not a destination. Start with basic scanning and gradually add more sophisticated checks. Focus on reducing false positives and making security feedback actionable. Most importantly, make security part of your team’s culture, not just your tools.
Building secure software doesn’t have to slow down delivery. By integrating security into your CI/CD pipeline, you catch vulnerabilities early and fix them cheaply. The tools and patterns shown here work for any application, not just our simple Flask demo.
The key is starting somewhere. Pick one security scan and add it to your pipeline. Once that works smoothly, add another scan. Before long, you’ll have comprehensive security coverage without sacrificing development speed.
Security isn’t someone else’s job anymore. With DevSecOps in CI/CD, it’s everyone’s responsibility, automated and built into how we work.
If you’re looking to build a secure delivery model that matches your business goals, we’re here to help. Talk to our experts to learn more about DevSecOps as a service to meet your governance needs.